Market Skirts

Posted on

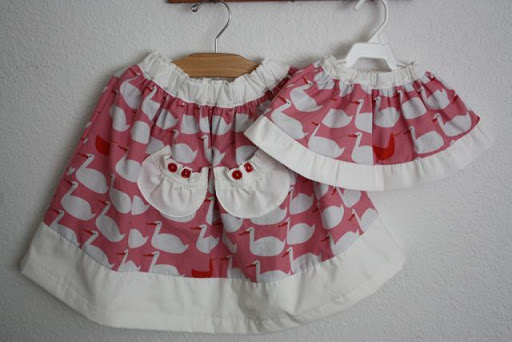
Continuing on my baby sewing kick, I made matching Market Skirts for A and her soon-to-be baby sister. I love the Red Letter Day print from Lizzy House and of course it had to be pink for Allison. I also got the orange version of this but decided to make both skirts the pink. Now I just need to come up with something sort of coordinating for brother. I don’t think pink geese would work and he would look like a crazy old man if I made pants or something from the orange. So, still thinking about it. I will actually try to get a picture of Allison wearing the skirt and the goal is to have family pictures after the baby comes.

I modified the length on the big skirt, since A is 4 and has long legs. I left the waistband the same size, increased the print length to 12″ and the bottom band to 5″. The bottom was a little long, so I should have only made it 4″. I left the width of each tier the same. For the approximate newborn size, I shrank it both length and width-wise. For a 14″ waist, I cut 2 each at: waistband was 11″x2.5″, middle band 18″x5″, bottom band 21″x2″. I also did the construction a little differently. For the bottom band, I cut two pieces 21″x4″, sewed them together at the sides and folded them in half  to get the double thickness like the tutorial suggests. That way, I didn’t have to hem it. (I did this with the big skirt, too, but ended up hemming it since it was a little long). I also sewed the bands into circles and gathered them that way. It’s not any harder to gather in a round than in a straight line and this way your side seams match a little better and the bottom folded over band doesn’t have an exposed seam.

I only did the pockets on the big skirt, but I might try to shrink down the pattern for baby skirt and only put on one. I love how they turned out.


Baby Kimono

Posted on

I think I decided that this little kimono is going to be baby sister’s coming home outfit. I finally got around to making Habitual’s kimono tutorial. I think you can still get the tutorial, but you have to email her. The pattern is really easy. I made it 2 inches longer to make it more of a dress that she will wear over a onesie. I just had a hard time deciding on fabric and I wanted to make my own bias tape but I couldn’t find any coordinating fabrics in my stash late last night. And in my indecisiveness, I forgot that I had put a batch of cookies in the oven. I’m not sure how long they over-baked, but they were just a touch shy of charcoal. Oh well, I blame it on pregnancy brain.

I did the kimono because I kind of gave up on the ruffled bag for now. It’s most of the way done; I just need to finish the quilting on the top piece and figure out what the straps are going to look like. But, the quilting has been giving me fits and the bag turned out too big for a purse and too small for a diaper bag. So, maybe another attempt someday. I was proud of my interior zipper I put in the lining, based on this tutorial, but oh well.


My Favorite Sewing Tip- Stopping the Frayed Tangled Mess of Prewashing Fabric

Posted on

This is for Sew Mama Sew’s favorite sewing tip list. I do a lot of clothing sewing so I usually prewash every piece of fabric I buy. I hate washing it and losing a few inches worth of fabric to shredding on the ends. Especially the higher-end quilting cottons; they seem to shred the worst. What I do now is serge both raw edges when I get the fabric home and voila, no more shredding. Then I can pull the fabric from the dryer and fold it up neatly without trimming all the little thread balls off the edges. Much easier. Without a serger, a zig-zag stitch or overedge stitch would also work.


In Progress

Posted on

I’m in the middle of making up my own version of this bag. Usually I go on a rant about how most Vera Bradley stuff is so old lady looking and so stinkin’ expensive and I have no idea why it is so popular, especially with dancers. But I got a flyer in the mail with the Cha Cha bag on it and thought it was actually kind of cute. But not $58 worth of cute. That and the bag itself is pretty small. So I set to making it myself. I found some cute fabric at Joann, drew up the dimensions and started sewing. It’s about halfway done. I’ve got all the ruffles attached and the thing is heavy. Not so good. But, if I can figure out a good way to interface the outer layer it might work out. I also want to put in an interior zipper pocket and a cell phone pocket. Size-wise, it’s going to be about the same size as the dance bags I’ve been making. I just need to find some faux-leather straps and I think the look will be complete. I definitely know why I buy patterns instead of drafting my own. I’m not much for knowing how things go together. But, everything is a learning experience. I do know that now that I’ve sort of figured out my ruffler, I love it. There is no way I’d do all those ruffles by hand.


Another Dance Bag

Posted on

I made a dance bag for a friend’s daughter like the one I made for Allison. The next one I make, I will have to come up with a better way to get the pockets to go around the corners better. Maybe a pleat on the bottom of each one. I borrowed a friend’s embroidery machine to do the name and since she is looking to sell it, I might even buy it from her. Not that I have anywhere near the room for another machine but it would be nice to have.

The bag came together a little easier this time, since I had made one before. Next time I make one, I might even get the gumption to take pictures and post a tutorial. I enjoy doing custom work for people, especially since lately Allison doesn’t want to wear most of the stuff I make for her. Oh well, the next baby will be a captive audience for the next few years. 
In other news, the Redding Handmade Etsy Team had a mini show at Sweet Spot and I sold a few of my baby items to friends. It was a lot of fun and I’m looking forward to more events in the future. You can search on Etsy for our local artists by entering our team tag of rhteam.


Baby Dress for Baby Sister

Posted on

I wanted to try out a retro Simplicity pattern to see if I would like it as a blessing dress for the new baby (although that would mean actually deciding on a name sometime before July). And after seeing one made on A Feathered Nest’s blog (on my sidebar) I went for it with one of my coveted Heather Bailey Freshcut prints. I have such a hard time cutting into my stash of designer fabrics, but I can’t buy more if I don’t use what I have, blah, blah, blah. It’s not the best picture since the quilt I used as a background is too busy, but I did like how it turned out. Not quite what I had in mind for a blessing dress, but still cute. It has pleats on the front and I think I want pintucks instead. So, I’ll keep looking around and maybe try to modify this pattern before I use the Swiss batiste I bought. BTW, my mom made the quilt in the background for my birthday using 30’s prints that I love.


Doodle Purse

Posted on

My daughter had a birthday party to go to, so I made a Doodle Purse based on this tutorial at MaKC Creations for a birthday present. I had bought a pad of paper and Pipsqueak markers at Target to go in it and sort of modified some of the dimensions. The individual pockets for the markers didn’t work out, so after three tries and a lot of seam ripping, I decided to make one big, pleated pocket to hold them. The pleats keep the outside lying flatter and I closed the pocket with two pieces of velcro. I really wanted the individual pockets for each marker but I think this works out better because now the birthday girl can put whatever markers, crayons or pens she wants in there.

I used a button and a hair elastic to keep it closed.
After way more time than it should have taken, I think it turned out pretty cute. Next time I might have the marker pocket opening on the end closer to the pockets so when the purse is closed, the pocket opening is upright, instead of upside down. I like going for more useful presents for birthdays since I never know what to get for A’s preschool friends.

An Easter Dress

Posted on

I finished Allison’s Easter dress last week. I used some Amy Butler Love fabric that I got from the new fabric store in town, The Fabulous Fabric Shop, as well as some fabric from my stash. Shirring is my go-to technique lately, and I really like using a different fabric for the skirt. I got a few cute pictures of it, hopefully will get a few more on Easter. The tutorial I used was from Fave Crafts Sewing Crafts from Bloggers eBook. I sort of changed the construction order, but it was a really easy dress.


90 minute (well almost) shirt

Posted on

I wanted to jump on the bandwagon of making a cute lapped-neck t-shirt like Dana from MADE for boy month. Well, it wasn’t quite a 90 minute enterprise. Actually, it was kind of cursed from the start. I didn’t have a onesie in Ian’s size that I could take apart, but I did have a Simplicity pattern of a lapped-neck t-shirt. But, it was only a medium and I knew it wouldn’t fit. So, I had to make sure I cut the pattern bigger, and especially longer. As cute as his little chubby tummy is, I’m not a fan of it hanging out of his shirt. And I wanted to try it on something other than the nice green knit fabric I bought. I found a NASA Langley t-shirt I had been holding on to, but knew I would never wear again. Perfect. I cut out the short sleeve pattern, cut the ribbing for the neck, then went to serge the edges for a bit of decoration. Apparently, my old, slightly cranky serger doesn’t do knits. I thought that kind of was in the job description of a serger. But I ended up with a skipped stitch every inch or so down the ribbing. Not pretty. I pulled out the stitching (because I’m a cheapskate and hate wasting fabric) and went ahead and sewed it to the neck edges. Except I forgot to take into account that the pattern calls for folding down a 5/8″ hem at the neck instead of ribbing. The neck edges ended up too high up and covered part of the logo on the shirt, which was the whole reason for using that particular shirt in the first place. Picking out the stitches was not an option: I had used the knit stretch stitch on my machine and it is a pain to pick out. So, I wasted the ribbing after all by just trimming the neckline and starting over with new ribbing. And long story even longer, the shirt wasn’t quite long enough to do I deep enough hem to lay nice. Oh well. It turned out cute in the end.


One More Baby Item

Posted on

I’ve been meaning to make the Undercover Crate pattern for a long time but just never got around to finding a crate. I found little ones at the dollar store that were perfect to hold the baby shower gift previously posted. The pattern is really easy (and free!). At the end of the pattern, it tells you how to modify the pattern to fit any sized crate. I just changed the side B length (the pink fabric), since it was a little crate (only 6″ high) so 9″ wouldn’t have let the brown fabric be seen on the outside. I took off a couple inches from the pink height and added it to the brown inside fabric height. Very easy project and turned out great results. I need to make a few more for the kid’s rooms. This crate was 6″h x 8 1/2″l x 7 1/2″ w. I had bought 1/3 yard of each of the fabrics and just barely squeezed it out of the brown, so a little more would have been nice. I also added a covered button to the middle front of the long side. A bow would have been nice, too. A cute, useful packaging option for gifts.