Hannah Dress

Posted on
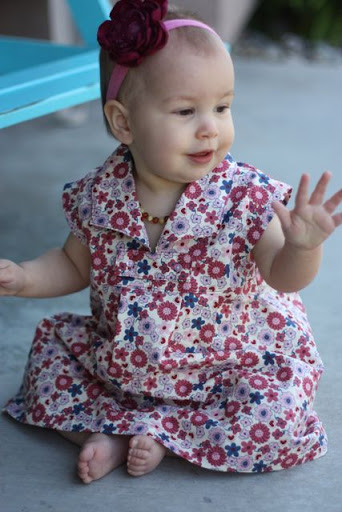
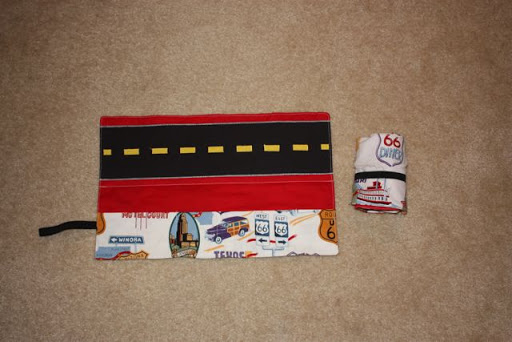
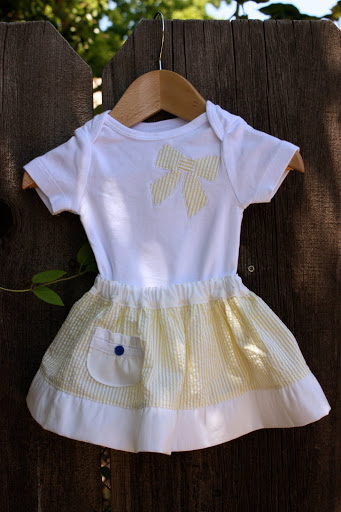
I found this cute Etsy shop, Yeppar, through a giveaway and just had to have the Hannah dress pattern. I made it up in the 12m size for baby M.
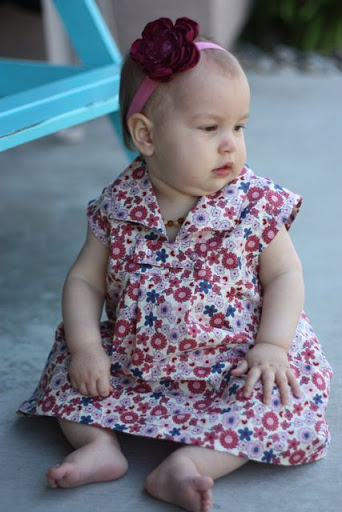
It came together fairly quickly. There were just a few minor issues with the pattern and instructions but overall I loved the way the collar turns out. I just used some random fabric from my stash since I didn’t want to cut into the good stuff on an unproven pattern. But now I will make M at least one more of these. The pattern goes up to a 5T so I can even make one for A.
Here are some of the edits and things I will do differently next time. For one, the pattern doesn’t have seam allowances. I will cut the actual pattern out with these allowances instead of waiting to add them when I cut out the fabric. Another issue was with the collar. The instructions say to finish the edge of the collar by folding under 1/2″, then another 1/2″. This should be 1/4″ then another 1/4″. A full inch and you can’t sew down the back inside of the collar to the back of the dress. I will probably finish the underarm of the dress a little differently next time, too. I didn’t like how there was a seam floating in the middle of the dress. So I followed the directions but made my seam connect to the sleeve edge seam. I’m not really sure what I’ll do next time, but I’ll have to think about it. I also constructed the little button closure a little differently. I folded in 1/2″ on either short side, then sewed right sides together down the long side, turned right side out, then top stitched. The way outlined in the directions turned out too sloppy for me. Oh yeah, I also made a 2T length on the 12m size. The original was just a little too short for my taste. It would make a very cute shirt, though.
All in all a very cute pattern and fairly easy to construct. Easy to get on and off, too. No elastic, zipper or buttons in the back to worry about.

Happy Easter!

Posted on

So, it’s been awhile 🙂 As usual, I’ve gone more than a month without blogging. I’ve been busy- I made the girls’ Easter dresses as well as a bow tie for Ian. I also messed up the rotary hook on my machine and had to wait almost a week for the replacement part to arrive. And I officially hate making clothes for me. I scrapped the dress I was making for me. Usually with a commercial pattern, I go down at least one, maybe two sizes from what the measurements say. This time, I did that and made a muslin of the bodice, nope, didn’t fit. The next size up, still no. So I just went with the size the measurements indicated. As I expected, the waist fit but it was huge in the bust and under the arms. I just don’t get it. To top it off, the waist pieces didn’t even fit together the way they should have. I should have just saved the money and bought a dress from one of those places like Shabby Apple. Oh well.


Pink Fig Mia Top review

Posted on

I bought this Pink Fig pattern a couple months ago and found the perfect fabric at the beginning of January: Fandango by Kate Spain. The peaches, browns and greens are just lovely and no pink anywhere. I made it for baby M since A is still in her pink phase and I usually have to bribe her to wear anything I make. Anyway, I made some modifications to the pattern as written and since I couldn’t find anybody else online talking about this pattern, I thought it might help someone else. I have to say that the top looks way cuter on the baby than on the hanger. I also added an inch to both the top skirt and underskirt to be more of a dress than a tunic.

My first issue was with cutting out the pattern pieces. The ruffle and tie pieces were longer than the fabric width. I used standard quilters cotton, prewashed, so it wasn’t abnormally narrow fabric. For the small size, it wasn’t a big deal, but for larger sizes, it will be.

For the bodice, I tried to follow the original instructions, but it would have left too many shirring lines just tied instead of sewn into seams. I also did the rolled hem too big and didn’t have enough space left to shir around the neckline and sleeves. Instead, I recut the bodice pieces and only sewed one of the side seams, not both. This way, I could shir from one side to the other and finish the side seam after and catch the elastic in the seam. I also shirred across the sleeve and did the rolled hem before sewing the sleeve seam just to make a neater finish. I also did the rolled hem on each piece of the bodice and sleeve before assembly since my serger doesn’t completely roll the hem under going over a seam allowance.

One other issue I had on the bodice was how to place the shirring lines. If I started at the top and followed the neckline, they would be hopelessly curved by the time I got to the bottom. And from the bottom up, the final shirring across the sleeves and bodice crossed over the top shirring line. So, I faked it and went from the bottom up and tried to ease the lines closer to a curve when I got up near the top.

I wasn’t sure about the final product until I tried it on M. Way cute and I really want to make more, possibly to sell. I’m planning on making matching mary jane shoes and I already finished the frayed flower hair clip. I’ll try to take better pictures next week when I get everything finished and M wears it to church. Whew, kind of a wordy post but hopefully it will help anyone looking for info on the pattern.


Creations by Kara


Christmas present: Toddler Backpack

Posted on

I finished another present. Woohoo for me 🙂 I used Made by Rae’s Toddler Backpack pattern. I added 3 inches to the height but I really should have just left it alone since the original size is just perfect for a 2 year old. Since I made it bigger, I didn’t have enough piping to go all the way around both front and back, so I didn’t put it on the bottom back. I had to use the zipper foot for most of the construction because of the piping and I had to keep telling myself to keep my fingers back- I was afraid of getting caught by the needle. And again, the pictures don’t do it justice.

Stockings

Posted on

I made these stockings last year but didn’t quite finish the embroidery or the hanging loops. So this year, I pulled them out and finished them. And I was able to put M’s name on one since last year we didn’t know if we were having a boy or a girl. I used this tutorial from PurlBee and used an embroidery machine to do the names.


Aprons

Posted on

 I’m trying to keep the momentum going of finishing Christmas presents. We went to visit family for Thanksgiving so I didn’t get any sewing done, but I did buy more fabric 🙂 I finished the aprons last week and didn’t get around to taking pictures until today. I used the Montessori apron tutorial from Sew Liberated as well as this tutorial by Stardust Shoes for Michael Miller. I made A’s bigger to match the second pattern but used the neck and waist strap from the first tutorial. I took a picture of them both together but it was blurry and I just didn’t have the energy to set everything up again.


Still Waiting

Posted on

Although I’m not officially “due” for another 2 weeks, I am getting a little tired of being pregnant. But, I got another baby outfit done. It’s much more fun to sew than to clean or do laundry. I got this pretty yellow seersucker fabric from the new fabric store in town and knew it would be perfect for another market skirt. This time, I added the pocket and appliqued a coordinating onesie.

I love how it turned out and might even make a seersucker skirt for me. The elastic waist will be perfect 🙂 For the appliqued bow, I just searched for a picture of a hair bow, found one I liked and traced it. I will be making a few to put in my etsy shop one of these days. I also made another ruffle bum onesie but I can’t decide what to put on the front, it just feels a little plain. Now all I need is the baby to model these outfits.


A few random projects

Posted on

I’m trying to get things done before the baby comes so there are a few random projects I’ve been working on. I have a pile of old shirts waiting to be refashioned so I made a baby skirt out of one of them. It was relatively easy but next time I won’t put quite so many strips into the bottom ruffle. It was a little too full. But all I did was cut off the bottom half of the t-shirt the desired length, plus about 1 inch to fold over for the waistband. I used the bottom hem of the shirt so I didn’t even have to hem it. I used my serger for a rolled hem on the ruffle and also stretched it while sewing to make a lettuce edge. Gathered then sewed the ruffle, folded over a waistband, inserted elastic, and ta-da, baby skirt. Ok, so maybe time-wise it would have been better to just buy the skirt I saw on clearance at Target but this used up a shirt and next time it should go a little faster.

I made new curtains for the kids’ bedroom since they are now sharing and the pink flowery ones weren’t going to work for Ian. I used Sweetwater’s Make Life Silly fabric.

I also made another Undercover Crate to go in our living room for toy storage. I need to make one more but I ran out of muslin. The liner turned out a little loose, so I’m going to increase the seam allowance to 1/2″. I used another Sweetwater fabric, from their Authentic line. Both fabrics I got from my favorite little online fabric shop, Fabritopia.