Yet Another Baby Shower Gift

Posted on

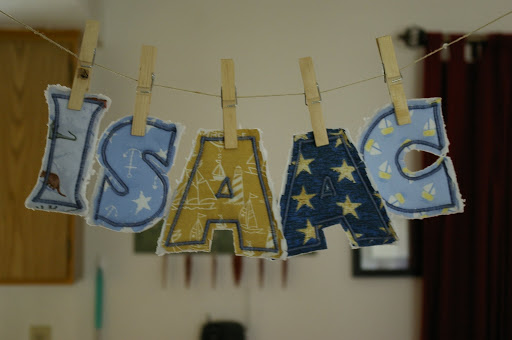
I made a set of raggy letters using the little boy’s name for a gift. I got the idea for it from this blog post. I think they turned out pretty cute. The main idea is for them to be something soft for baby to play with and later to learn his name. But they could also be used as wall hangings. I might still add a little ribbon loop for hanging or putting them all on one of those plastic link-a-doo things to keep them all together. The YW and leaders helped me prep them by tracing the letter on the fabric and cutting out fleece for the middle and chenille for the back. Then I sewed a satin stitch following the tracing using my walking foot to keep the layers all together. I then cut the letter out leaving about 1/4″ space around the stitching. Clipped into the seam allowance to help the fraying, then I’ll run them through the washer and dryer a couple times to get them nice and frayed.
And my newest addition to my sewing pile: a used Euro-Pro 534 DSi serger. I found it at a yard sale on Saturday. It appears to work decently but I’m not really sure. The stitch quality seems to drift- it starts out ok, then loosens, then goes back to ok. I don’t have a clue so I’ll probably take it to get looked at sometime soon. It also came with a whole bunch of feet still in their (original?) packaging. I spent some time online trying to figure out what each one was for. There isn’t much online for this specific serger so it’s pretty much a guessing game. But I’m excited to have a serger, mainly for things like rolled hems.

Wet bag for swimming

Posted on

Swim lessons started on Monday so I got going and made a lined wet bag. I had a FQ from the Beach Babies line that I love, a scrap of ripstop nylon left-over from making changing pads and a 12″ zipper, so I didn’t have to go buy anything for this project. The idea came from Little Birdie Secrets and the covered zipper idea came from a tutorial at Flossie Teacakes. It’s about 11″x9″ and the perfect size for a little girl’s swimsuit.

Allison got into her swimsuit a little too early this morning. She likes the idea of swim lessons but hates going under the water. Each day after lessons she says she is never ever going back. But then the next day she is excited again. Oh well.


Sew-along skirt

Posted on

I finally completed my skirt for the Presser Foot sew-along. I adjusted the pleats so the skirt would ride a little lower in my hips. Doing that, though, caused the facing to not fit (since I cut it out before I decided to make the skirt a little bigger) so I just folded down the waist 5/8″ and sewed it. I also used my blind hem foot to hem the bottom. I’ve actually gotten pretty good at using it. It is kind of intimidating at first but after a little practice and a few tutorials it saves a lot of handwork, which I hate.

Baby Boy Shirt

Posted on

It’s so hard to come up with things to make for little boys. Girls are easy; cute dresses are so much fun to make. But I did make Ian a little collared shirt from this Butterick pattern. The plan is to make Ian a shirt and Allison a sundress out of the Beach Babies fabric that I love (but I can’t find the actual fabric that I got online). I’m not a super big fan of the way the shirt turned out- too wide even for my chunky boy. But, I will either try to pull it in or find a different pattern. And I’m not sure if I want a shirt-tail hem, which this pattern has, or a straight hem. Something else to think about.

PJ shorts

Posted on

I made these shorts for Allison to wear to bed. I figured why go out and buy something when I have half a fabric store worth of fabric and almost as many patterns (since I need a pattern for almost anything- not that creative). I used Simplicity 3584 but any simple shorts or pants pattern would work. I added some rick-rack to the bottoms and a little piece of ribbon at the back seam so she could tell front from back. I pair them with some simple white cami’s that I got on clearance a while back. Perfect for the 80+ degree nights we get in the summer.

Re-fashioned T-shirt

Posted on

This tutorial has been on my list of things to make since I found it a couple weeks ago. Here is my first attempt to turn a t-shirt into a newborn gown. It was super easy and turned out pretty cute, except I was going for a short-sleeve look and they turned out a little too long. I can also see making a baby t-shirt out of an adult t-shirt with this, just cut it shorter and hem without the elastic. I think this will be one of my new go-to baby shower gifts. It came together very quickly- about a half an hour of sewing. I want to make a few for Ian, since they are great for keeping his legs covered at night, but it’s too hot for long sleeves. I’m going to find some light-weight t’s next.


Birthday Outfit

Posted on


Allison turns three next week, so I made her an outfit to wear for pictures. She of course wouldn’t model it for me so I had to settle for this. The skirt is from this tutorial from Grand Revival designs. It was really easy to make and turned out really cute. I appliqued a 3 and a flower to the t-shirt I got at Wal-Mart. The matching hair bow is still in the works.


YW New “Bee”ginnings

Posted on

***UPDATE***
You can find a full tutorial for the book holder on the left hand side near the top of my blog under Tutorials or by clicking here.


Here is what we are giving to the girls for our New Beginnings. They are book holders designed to hold the FTSOY book, PP book, PP journal and a pen. I got the idea from another poster on SugarDoodle. The theme is “Bee” thou an Example (like a lot of other people) mainly because I had so much yardage of the bee fabric. Here is a quick little tutorial I wrote up for how to make the book holders. It’s kind of messy but if you want to make some and have any questions, just email me. They are really easy and cute. I got 15 holders out of 2 1/2 yards each of the lining and main fabric (5yds total).
As for the pockets, it says sew from bottom of pocket up, but I think it is easier to sew from top of pocket down after making so many of them.