Pink Fig Mia Top review

Posted on

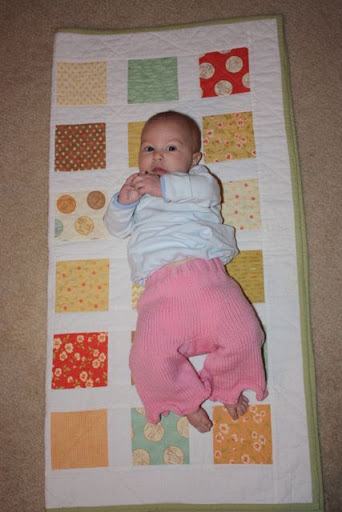
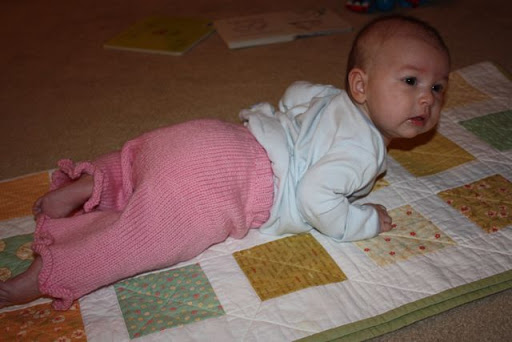
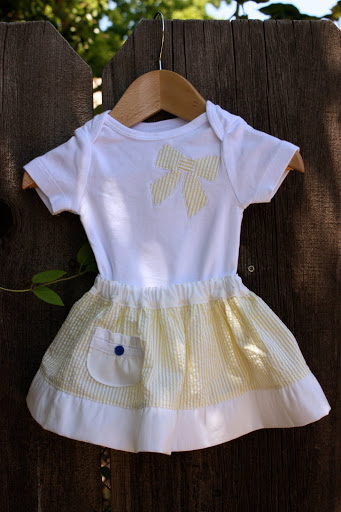
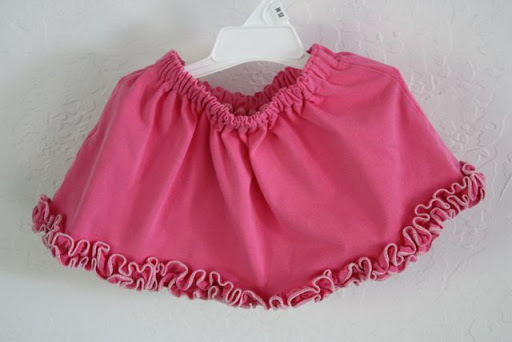
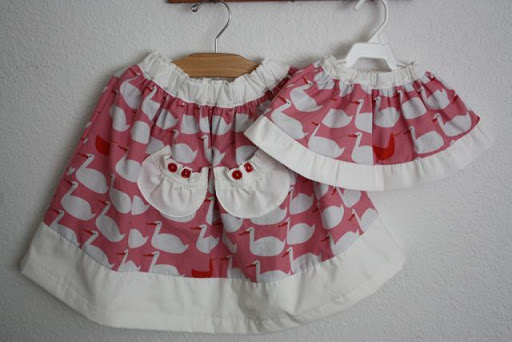
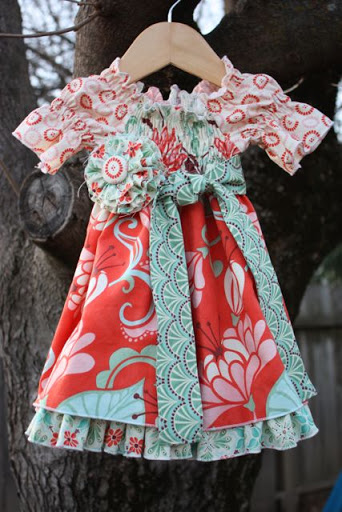
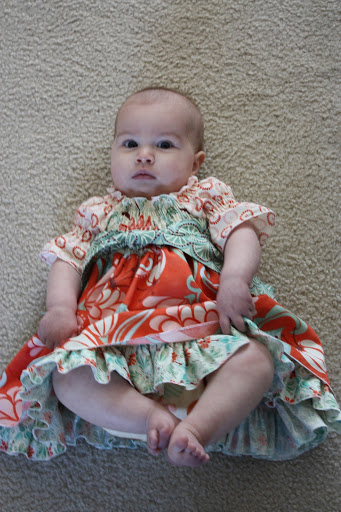
I bought this Pink Fig pattern a couple months ago and found the perfect fabric at the beginning of January: Fandango by Kate Spain. The peaches, browns and greens are just lovely and no pink anywhere. I made it for baby M since A is still in her pink phase and I usually have to bribe her to wear anything I make. Anyway, I made some modifications to the pattern as written and since I couldn’t find anybody else online talking about this pattern, I thought it might help someone else. I have to say that the top looks way cuter on the baby than on the hanger. I also added an inch to both the top skirt and underskirt to be more of a dress than a tunic.

My first issue was with cutting out the pattern pieces. The ruffle and tie pieces were longer than the fabric width. I used standard quilters cotton, prewashed, so it wasn’t abnormally narrow fabric. For the small size, it wasn’t a big deal, but for larger sizes, it will be.

For the bodice, I tried to follow the original instructions, but it would have left too many shirring lines just tied instead of sewn into seams. I also did the rolled hem too big and didn’t have enough space left to shir around the neckline and sleeves. Instead, I recut the bodice pieces and only sewed one of the side seams, not both. This way, I could shir from one side to the other and finish the side seam after and catch the elastic in the seam. I also shirred across the sleeve and did the rolled hem before sewing the sleeve seam just to make a neater finish. I also did the rolled hem on each piece of the bodice and sleeve before assembly since my serger doesn’t completely roll the hem under going over a seam allowance.

One other issue I had on the bodice was how to place the shirring lines. If I started at the top and followed the neckline, they would be hopelessly curved by the time I got to the bottom. And from the bottom up, the final shirring across the sleeves and bodice crossed over the top shirring line. So, I faked it and went from the bottom up and tried to ease the lines closer to a curve when I got up near the top.

I wasn’t sure about the final product until I tried it on M. Way cute and I really want to make more, possibly to sell. I’m planning on making matching mary jane shoes and I already finished the frayed flower hair clip. I’ll try to take better pictures next week when I get everything finished and M wears it to church. Whew, kind of a wordy post but hopefully it will help anyone looking for info on the pattern.


Creations by Kara


Last summer sewing- Jump Rope Dress

Posted on

 I finally got the Jump Rope Dress pattern from Oliver + S this last summer. My mom found it at a quilt shop in Paradise, I think. I took a chance and didn’t make it out of pink fabric but instead, navy blue with white polka dots. The buttons are pink, though. A is so hard to make stuff for lately. I had to bribe her a couple weeks ago to wear it to church. I hope M is not nearly so picky and maybe a little more girly.

And because my daughter is a nut:


Knit Longies

Posted on

Once I got on this cloth diaper kick, I just had to make a pair of woolen longies, or soaker. They are meant to go over a fitted diaper or prefold as a breathable but waterproof cover. I finally finished my first pair the other day and even lanolized them. I used the Li’l Aries free pattern and Cascade 220 wool. I didn’t want to use super nice and expensive wool for my first attempt and I’m glad I didn’t because they have a few issues. I had problems getting the short rows to look decent on one of the sides and I missed an increase here and there. But, oh well. They just barely fit M, too. So, they will be cute to wear during the day but the rise is a little short to wear over a thick nighttime diaper.


Little late- Halloween Costumes

Posted on

I have a huge backlog of sewing that I haven’t put up on the blog because, well, three kids keep you pretty darn busy. Who knew? Anyway, here is A’s Little Bo Peep costume that I made. I finished it about midnight the night before she needed it to wear to her preschool Halloween party. There is also an apron and lace ruffled bloomers to go with the dress.

Bean was a sheep, which I did not make, and M was just her adorable self in a little pumpkin sleeper I bought last year on clearance before we knew boy or girl.

And I just had to add this pic of A being a total goof. She is doing her “Scary Pumpkin” face.

Still Waiting

Posted on

Although I’m not officially “due” for another 2 weeks, I am getting a little tired of being pregnant. But, I got another baby outfit done. It’s much more fun to sew than to clean or do laundry. I got this pretty yellow seersucker fabric from the new fabric store in town and knew it would be perfect for another market skirt. This time, I added the pocket and appliqued a coordinating onesie.

I love how it turned out and might even make a seersucker skirt for me. The elastic waist will be perfect 🙂 For the appliqued bow, I just searched for a picture of a hair bow, found one I liked and traced it. I will be making a few to put in my etsy shop one of these days. I also made another ruffle bum onesie but I can’t decide what to put on the front, it just feels a little plain. Now all I need is the baby to model these outfits.


A few random projects

Posted on

I’m trying to get things done before the baby comes so there are a few random projects I’ve been working on. I have a pile of old shirts waiting to be refashioned so I made a baby skirt out of one of them. It was relatively easy but next time I won’t put quite so many strips into the bottom ruffle. It was a little too full. But all I did was cut off the bottom half of the t-shirt the desired length, plus about 1 inch to fold over for the waistband. I used the bottom hem of the shirt so I didn’t even have to hem it. I used my serger for a rolled hem on the ruffle and also stretched it while sewing to make a lettuce edge. Gathered then sewed the ruffle, folded over a waistband, inserted elastic, and ta-da, baby skirt. Ok, so maybe time-wise it would have been better to just buy the skirt I saw on clearance at Target but this used up a shirt and next time it should go a little faster.

I made new curtains for the kids’ bedroom since they are now sharing and the pink flowery ones weren’t going to work for Ian. I used Sweetwater’s Make Life Silly fabric.

I also made another Undercover Crate to go in our living room for toy storage. I need to make one more but I ran out of muslin. The liner turned out a little loose, so I’m going to increase the seam allowance to 1/2″. I used another Sweetwater fabric, from their Authentic line. Both fabrics I got from my favorite little online fabric shop, Fabritopia.


Market Skirts

Posted on

Continuing on my baby sewing kick, I made matching Market Skirts for A and her soon-to-be baby sister. I love the Red Letter Day print from Lizzy House and of course it had to be pink for Allison. I also got the orange version of this but decided to make both skirts the pink. Now I just need to come up with something sort of coordinating for brother. I don’t think pink geese would work and he would look like a crazy old man if I made pants or something from the orange. So, still thinking about it. I will actually try to get a picture of Allison wearing the skirt and the goal is to have family pictures after the baby comes.

I modified the length on the big skirt, since A is 4 and has long legs. I left the waistband the same size, increased the print length to 12″ and the bottom band to 5″. The bottom was a little long, so I should have only made it 4″. I left the width of each tier the same. For the approximate newborn size, I shrank it both length and width-wise. For a 14″ waist, I cut 2 each at: waistband was 11″x2.5″, middle band 18″x5″, bottom band 21″x2″. I also did the construction a little differently. For the bottom band, I cut two pieces 21″x4″, sewed them together at the sides and folded them in half  to get the double thickness like the tutorial suggests. That way, I didn’t have to hem it. (I did this with the big skirt, too, but ended up hemming it since it was a little long). I also sewed the bands into circles and gathered them that way. It’s not any harder to gather in a round than in a straight line and this way your side seams match a little better and the bottom folded over band doesn’t have an exposed seam.

I only did the pockets on the big skirt, but I might try to shrink down the pattern for baby skirt and only put on one. I love how they turned out.


Baby Dress for Baby Sister

Posted on

I wanted to try out a retro Simplicity pattern to see if I would like it as a blessing dress for the new baby (although that would mean actually deciding on a name sometime before July). And after seeing one made on A Feathered Nest’s blog (on my sidebar) I went for it with one of my coveted Heather Bailey Freshcut prints. I have such a hard time cutting into my stash of designer fabrics, but I can’t buy more if I don’t use what I have, blah, blah, blah. It’s not the best picture since the quilt I used as a background is too busy, but I did like how it turned out. Not quite what I had in mind for a blessing dress, but still cute. It has pleats on the front and I think I want pintucks instead. So, I’ll keep looking around and maybe try to modify this pattern before I use the Swiss batiste I bought. BTW, my mom made the quilt in the background for my birthday using 30’s prints that I love.


An Easter Dress

Posted on

I finished Allison’s Easter dress last week. I used some Amy Butler Love fabric that I got from the new fabric store in town, The Fabulous Fabric Shop, as well as some fabric from my stash. Shirring is my go-to technique lately, and I really like using a different fabric for the skirt. I got a few cute pictures of it, hopefully will get a few more on Easter. The tutorial I used was from Fave Crafts Sewing Crafts from Bloggers eBook. I sort of changed the construction order, but it was a really easy dress.


90 minute (well almost) shirt

Posted on

I wanted to jump on the bandwagon of making a cute lapped-neck t-shirt like Dana from MADE for boy month. Well, it wasn’t quite a 90 minute enterprise. Actually, it was kind of cursed from the start. I didn’t have a onesie in Ian’s size that I could take apart, but I did have a Simplicity pattern of a lapped-neck t-shirt. But, it was only a medium and I knew it wouldn’t fit. So, I had to make sure I cut the pattern bigger, and especially longer. As cute as his little chubby tummy is, I’m not a fan of it hanging out of his shirt. And I wanted to try it on something other than the nice green knit fabric I bought. I found a NASA Langley t-shirt I had been holding on to, but knew I would never wear again. Perfect. I cut out the short sleeve pattern, cut the ribbing for the neck, then went to serge the edges for a bit of decoration. Apparently, my old, slightly cranky serger doesn’t do knits. I thought that kind of was in the job description of a serger. But I ended up with a skipped stitch every inch or so down the ribbing. Not pretty. I pulled out the stitching (because I’m a cheapskate and hate wasting fabric) and went ahead and sewed it to the neck edges. Except I forgot to take into account that the pattern calls for folding down a 5/8″ hem at the neck instead of ribbing. The neck edges ended up too high up and covered part of the logo on the shirt, which was the whole reason for using that particular shirt in the first place. Picking out the stitches was not an option: I had used the knit stretch stitch on my machine and it is a pain to pick out. So, I wasted the ribbing after all by just trimming the neckline and starting over with new ribbing. And long story even longer, the shirt wasn’t quite long enough to do I deep enough hem to lay nice. Oh well. It turned out cute in the end.