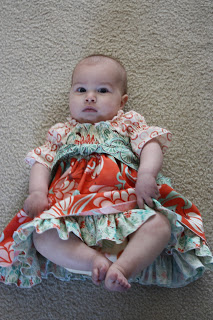
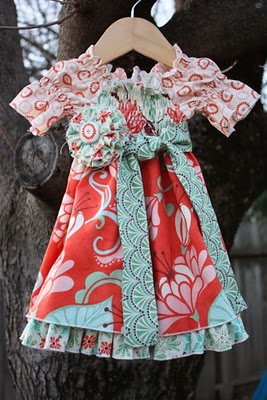
I bought this Pink Fig pattern a couple months ago and found the perfect fabric at the beginning of January: Fandango by Kate Spain. The peaches, browns and greens are just lovely and no pink anywhere. I made it for baby M since A is still in her pink phase and I usually have to bribe her to wear anything I make. Anyway, I made some modifications to the pattern as written and since I couldn’t find anybody else online talking about this pattern, I thought it might help someone else. I have to say that the top looks way cuter on the baby than on the hanger. I also added an inch to both the top skirt and underskirt to be more of a dress than a tunic.
My first issue was with cutting out the pattern pieces. The ruffle and tie pieces were longer than the fabric width. I used standard quilters cotton, prewashed, so it wasn’t abnormally narrow fabric. For the small size, it wasn’t a big deal, but for larger sizes, it will be.

For the bodice, I tried to follow the original instructions, but it would have left too many shirring lines just tied instead of sewn into seams. I also did the rolled hem too big and didn’t have enough space left to shir around the neckline and sleeves. Instead, I recut the bodice pieces and only sewed one of the side seams, not both. This way, I could shir from one side to the other and finish the side seam after and catch the elastic in the seam. I also shirred across the sleeve and did the rolled hem before sewing the sleeve seam just to make a neater finish. I also did the rolled hem on each piece of the bodice and sleeve before assembly since my serger doesn’t completely roll the hem under going over a seam allowance.
One other issue I had on the bodice was how to place the shirring lines. If I started at the top and followed the neckline, they would be hopelessly curved by the time I got to the bottom. And from the bottom up, the final shirring across the sleeves and bodice crossed over the top shirring line. So, I faked it and went from the bottom up and tried to ease the lines closer to a curve when I got up near the top.
I wasn’t sure about the final product until I tried it on M. Way cute and I really want to make more, possibly to sell. I’m planning on making matching mary jane shoes and I already finished the frayed flower hair clip. I’ll try to take better pictures next week when I get everything finished and M wears it to church. Whew, kind of a wordy post but hopefully it will help anyone looking for info on the pattern.


