90 minute (well almost) shirt

Posted on

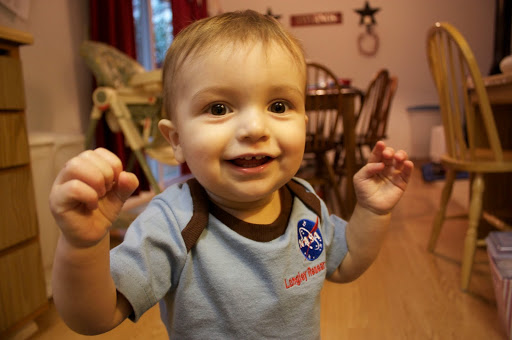
I wanted to jump on the bandwagon of making a cute lapped-neck t-shirt like Dana from MADE for boy month. Well, it wasn’t quite a 90 minute enterprise. Actually, it was kind of cursed from the start. I didn’t have a onesie in Ian’s size that I could take apart, but I did have a Simplicity pattern of a lapped-neck t-shirt. But, it was only a medium and I knew it wouldn’t fit. So, I had to make sure I cut the pattern bigger, and especially longer. As cute as his little chubby tummy is, I’m not a fan of it hanging out of his shirt. And I wanted to try it on something other than the nice green knit fabric I bought. I found a NASA Langley t-shirt I had been holding on to, but knew I would never wear again. Perfect. I cut out the short sleeve pattern, cut the ribbing for the neck, then went to serge the edges for a bit of decoration. Apparently, my old, slightly cranky serger doesn’t do knits. I thought that kind of was in the job description of a serger. But I ended up with a skipped stitch every inch or so down the ribbing. Not pretty. I pulled out the stitching (because I’m a cheapskate and hate wasting fabric) and went ahead and sewed it to the neck edges. Except I forgot to take into account that the pattern calls for folding down a 5/8″ hem at the neck instead of ribbing. The neck edges ended up too high up and covered part of the logo on the shirt, which was the whole reason for using that particular shirt in the first place. Picking out the stitches was not an option: I had used the knit stretch stitch on my machine and it is a pain to pick out. So, I wasted the ribbing after all by just trimming the neckline and starting over with new ribbing. And long story even longer, the shirt wasn’t quite long enough to do I deep enough hem to lay nice. Oh well. It turned out cute in the end.


One More Baby Item

Posted on

I’ve been meaning to make the Undercover Crate pattern for a long time but just never got around to finding a crate. I found little ones at the dollar store that were perfect to hold the baby shower gift previously posted. The pattern is really easy (and free!). At the end of the pattern, it tells you how to modify the pattern to fit any sized crate. I just changed the side B length (the pink fabric), since it was a little crate (only 6″ high) so 9″ wouldn’t have let the brown fabric be seen on the outside. I took off a couple inches from the pink height and added it to the brown inside fabric height. Very easy project and turned out great results. I need to make a few more for the kid’s rooms. This crate was 6″h x 8 1/2″l x 7 1/2″ w. I had bought 1/3 yard of each of the fabrics and just barely squeezed it out of the brown, so a little more would have been nice. I also added a covered button to the middle front of the long side. A bow would have been nice, too. A cute, useful packaging option for gifts.


Something accomplished today

Posted on

This afternoon has been one of those: Ian is teething and getting over a cold, so he in no way shape or form took a nap or even a quiet rest. He spent most of the time fussing and crying. But, I was able to ignore him long enough to try one of these felt rose clips from PurlBee. It’s really cute. I need to cut out a bunch to work on when I’m waiting for ballet class to get done or other little snippets of down time. It’s one of those self-contained projects that you can work on a little bit at a time and take all the supplies with you. I do need to find some more of the nice felt. There isn’t a very big color selection in town and if you’re going to go to all the trouble to hand-stitch something, it needs to be the good stuff.

Clamoring for my attention 🙂

Shirred Baby Dress and Ruffle-Bum Onesie

Posted on

I love making things for friend’s babies. A baby shower is a good excuse to get going and try something new. For a recent baby girl, I made an elastic smocked sundress with a ruffle-bum onesie to go underneath. I have done the sundresses before, but the ruffle onesie was something I had on the to-do list. I think it turned out cute. I’m a total perfectionist when it comes to some things, so I redid the first ruffle twice. The first time, the fabric underneath puckered, so I started over. Then I forgot to use a stretch stitch the second time so I went over the stitching with the knit stitch and ripped out the straight stitch. I guess I did it three times. The other two ruffles were much easier once I had that figured out. The knit stitch just ensures the stitches will stretch with the fabric.

Ruffle-bum onesie tutorial from Char by way of UCreate